

React: How to Use the Star Wars API for Beginners

Hello, I'm Michael. Like many people, I am an aspiring self-taught web developer.
My goal for this blog is to document and share the progress of my self-taught coding journey.
May the 4th be with you! In this article, to celebrate Star Wars Day, I learned and stepped through the process of using the Star Wars API to display information on a React website created with Vite!

Introduction
This article is a beginner-friendly guide on creating a React App that uses the Star Wars API to display information, featuring a Navbar with buttons to render components upon user clicks.
The Star Wars API offers access to an abundance of information from the Star Wars universe. Utilizing this API allows us to seamlessly incorporate Star Wars data into our applications and websites, providing a distinctive and captivating experience for both ourselves and fans of the franchise!
We will build a Navbar, Main, and Planets component together, and please feel free to copy, clone, or write the remaining similar components; Starships and People.
We will be using the following for this project:
Axios
React useState
React useEffect
Note: We will be focusing on learning React code, not CSS. However, feel free to clone the project or copy the CSS code.
The Star Wars API
The Star Wars API contains data from the first seven Star Wars films, including Planets, Spaceships, and Vehicles which we will be working with.
The Star Wars API is an open API, meaning it is a publicly available application programming interface and does not require authentication.
Since the Star Wars API is an open API, we do not need an access token, simplifying the connection process!
What is Axios, and why use it?
To access the Star Wars API, we will use Axios. Don't worry, it's a very easy setup, and we will only take a few lines of code to access the API.
So what is React Axios? React Axios is a popular library developers use to make HTTP requests in React applications. It simplifies fetching and handling data from APIs, offering features like automatic JSON data transformation and easy error handling. Developers prefer using Axios due to its ease of use, flexibility, and wide compatibility with different browsers.
Initially, I tried using JavaScript fetch and a try-catch block to retrieve data from the Star Wars API, but I ran into too many problems. After researching, I saw that many React developers use Axios for API calls and decided to go with that as a solution.
The React environment
For this project, I used the VS Code editor to create a React app with Vite. Afterward, I converted it into a GitHub repository and deployed it on Netlify.
If you would like to learn how to set up a local React development environment, I wrote the following two beginner-friendly articles:
React Imports
To start, we will import React useEffect, useState, and Axios as follows:
import React, { useEffect, useState } from "react";
import axios from "axios";
Install Axios
To install Axios, simply run this command:
npm install axios
Planets Component
Next, we will create a Planets component. This component will handle the API call that accesses the Star Wars API planets pages.
Once completed, it will:
Make an API call
Render a loading HTML block
Map through and create 10 plant cards
Create the next and previous page buttons
function Planets() {
    const [isLoading, setLoading] = useState(true);
    const [starWarsDataPlanets, setStarWarsDataPlanets] = useState();
    const [urlPlanets, setUrlPlanets] = useState(
        `https://swapi.dev/api/planets/?page=1`
    );
}
Using React useState, we create the following variables:
isLoading: to create a loading state
starWarsDataPlanets: to hold the API data
urlPlanets: To cycle through the available pages
API call with Axious and useEffect
Next, we write and add the code inside of the Planets function to access the Star Wars API. We use React's useEffect with Axios as follows:
    useEffect(() => {
        axios.get(urlPlanets).then((response) => {
            setStarWarsDataPlanets(response.data);
            setLoading(false);
        });
    }, [urlPlanets]);
Axios easily handles the API request. We then save the response data to the starWarsDataPlanets variable using the setStarWarsDataPlanets function.
We use the function setLoading to change the isLoading variable to false after we receive the response data.
The urlPlanets is used as the useEffect dependency array, which enables us to run the Planets function automatically every time the urlPlanets variable changes.
Loading HTML block
Adding to the Planets function, we create an if statement that checks if the isLoading variable is true, which means the API call is currently running. If the isLoading variable is true, we return an HTML loading block. This block includes the Previous Page and Next Page buttons, currently disabled.
Creating this step that checks if the API is loading is crucial! The returned data from the API will display in the console log before it's actually available to render, which caused me a lot of debugging confusion I would like you to avoid.
    if (isLoading) {
        return (
            <div>
                <div>
                    <h1 className="txt-shadow-gold">Planets</h1>
                    <button
                        disabled={true}
                    >
                        ⏪ Previous Page
                    </button>
                    <button
                        disabled={true}
                    >
                        Next Page⏩
                    </button>
                </div>
                <div className="overlay">
                    Loading...
                </div>
            </div>
        );
    }
JavaScript Map
After we receive the data from the Star Wars API, which is initially page one of planets, we use the JavaScript map method to create a variable aptly called allPlanetsOnPage.
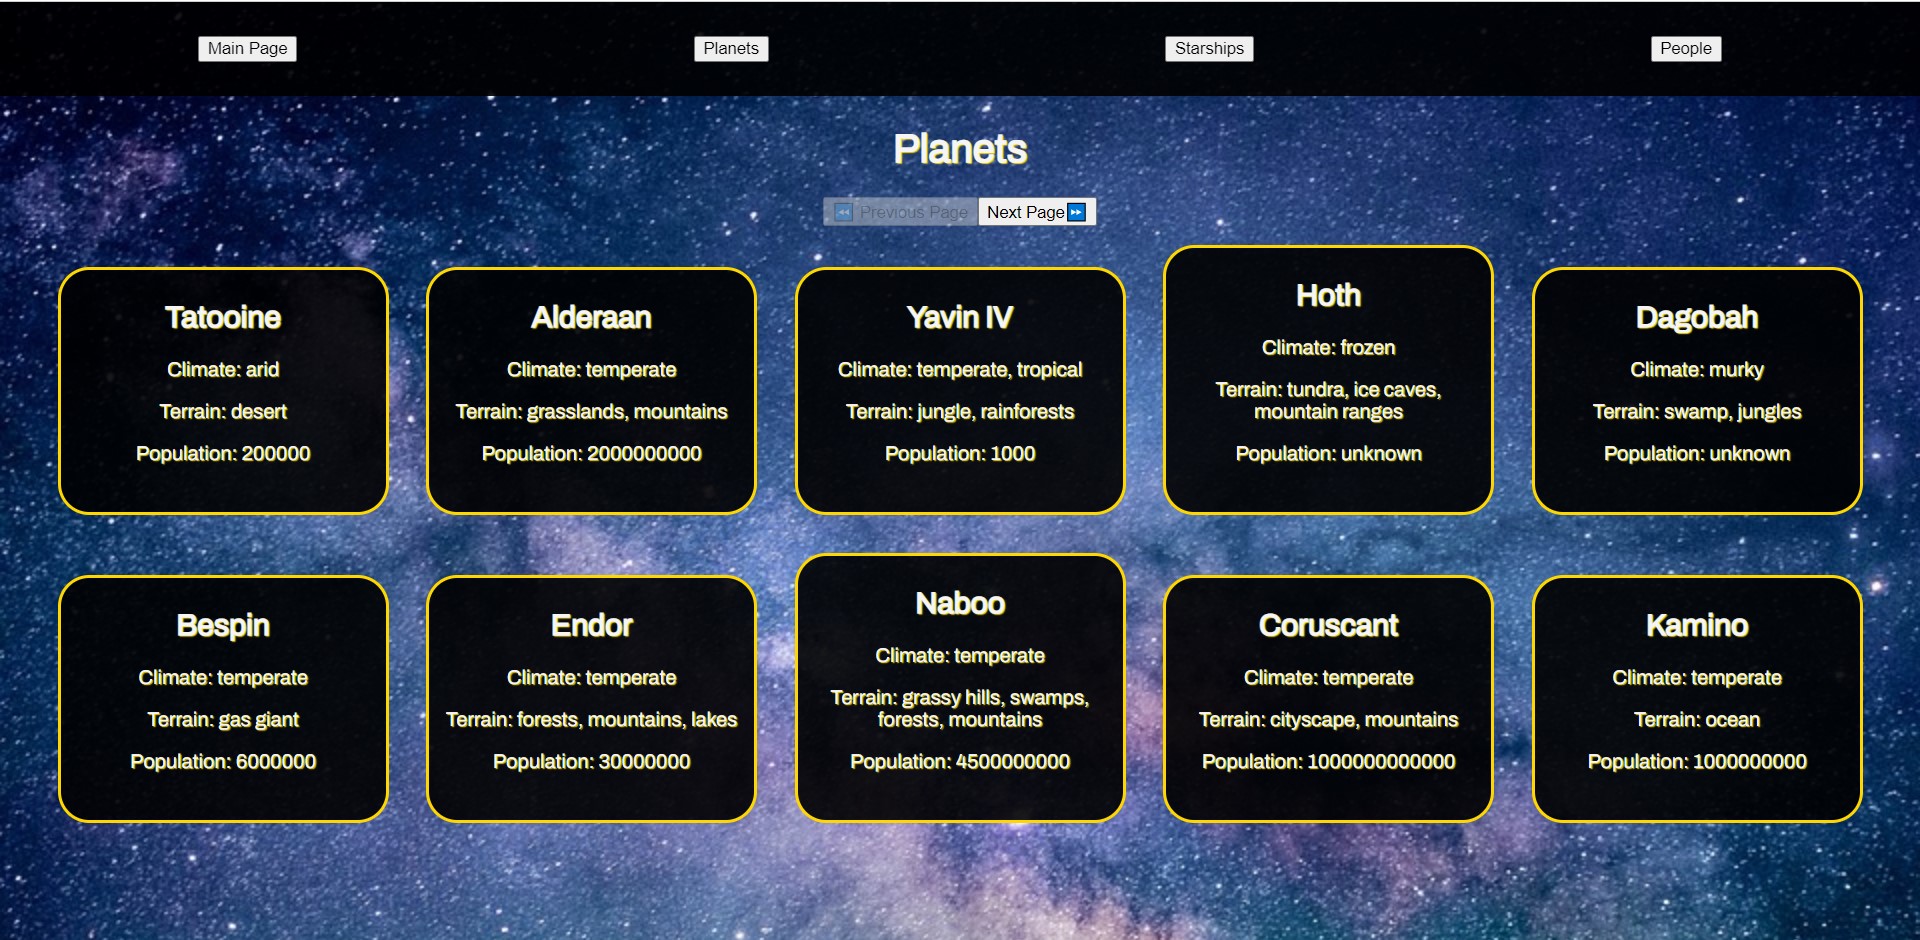
Each page contains 10 planet records, respectively. When mapping through each planet, we return an HTML card block that contains the planet's name, climate, terrain, and population information.
We assign each of the names of the planets as the React key. The React key is a special attribute added to elements in a list or an array to help React identify and track each item uniquely, making it easier to update, reorder, or delete items efficiently.
    const allPlanetsOnPage = starWarsDataPlanets.results.map((planet) => {

        return (
            <div className="card card-planet">
                <h2 key={planet.name}>{planet.name}</h2>
                <p>Climate: {planet.climate}</p>
                <p>Terrain: {planet.terrain}</p>
                <p>Population: {planet.population}</p>
                <br />
            </div>
        );
    });
Render the Planet pages
Now that we have the first planet page stored in the allPlanetsOnPage variable, we return an HTML card block that contains the Previous Page and Next Page buttons, along with a <main> div that renders the planets.
We set a click event for each button that runs corresponding functions we are about to write, and we write a ternary operator that checks for a null value provided by the API. If the previous or next page has a null value, we set the disabled attribute to true.
    return (
        <div>
            <h1 className="txt-shadow-gold">Planets</h1>
            <button
                onClick={previousPage}
                disabled={starWarsDataPlanets.previous ? false : true}
            >
                ⏪ Previous Page
            </button>
            <button
                onClick={nextPlanetPage}
                disabled={starWarsDataPlanets.next ? false : true}
            >
                Next Page⏩
            </button>

            <main>{allPlanetsOnPage}</main>
        </div>
    );
Next and Previous functions
Now we write the nextPlanetPage and previousPage functions that are called when the user clicks the corresponding button.
The functions first set the loading state back to true and then set the next and previous planet URLs provided by the API.
    function nextPlanetPage() {
        setLoading(true);
        setUrlPlanets(starWarsDataPlanets.next);
    }

    function previousPage() {
        setLoading(true);
        setUrlPlanets(starWarsDataPlanets.previous);
    }
The completed Planets component
import React, { useEffect, useState } from "react";
import axios from "axios";

function Planets() {
    const [isLoading, setLoading] = useState(true);
    const [starWarsDataPlanets, setStarWarsDataPlanets] = useState();
    const [urlPlanets, setUrlPlanets] = useState(
        `https://swapi.dev/api/planets/?page=1`
    );

    useEffect(() => {
        axios.get(urlPlanets).then((response) => {
            setStarWarsDataPlanets(response.data);
            setLoading(false);
        });
    }, [urlPlanets]);

    if (isLoading) {
        return (
            <div>
                <div>
                    <h1 className="txt-shadow-gold">Planets</h1>
                    <button
                        disabled={true}
                    >
                        ⏪ Previous Page
                    </button>
                    <button
                        disabled={true}
                    >
                        Next Page⏩
                    </button>
                </div>
                <div className="overlay">
                    Loading...
                </div>
            </div>
        );
    }

    const allPlanetsOnPage = starWarsDataPlanets.results.map((planet) => {

        return (
            <div className="card card-planet">
                <h2 key={planet.name}>{planet.name}</h2>
                <p>Climate: {planet.climate}</p>
                <p>Terrain: {planet.terrain}</p>
                <p>Population: {planet.population}</p>
                <br />
            </div>
        );
    });

    return (
        <div>
            <h1 className="txt-shadow-gold">Planets</h1>
            <button
                onClick={previousPage}
                disabled={starWarsDataPlanets.previous ? false : true}
            >
                ⏪ Previous Page
            </button>
            <button
                onClick={nextPlanetPage}
                disabled={starWarsDataPlanets.next ? false : true}
            >
                Next Page⏩
            </button>

            <main>{allPlanetsOnPage}</main>
        </div>
    );

    function nextPlanetPage() {
        setLoading(true);
        setUrlPlanets(starWarsDataPlanets.next);
    }

    function previousPage() {
        setLoading(true);
        setUrlPlanets(starWarsDataPlanets.previous);
    }
}

export default Planets;
The Starships and People components
The Starships and People components are both created in an identical fashion to the Planets component we just created. Both the Starships and People components have their own unique HTML card block values to return, but the coding concepts are the same.
From my GitHub repo, feel free to clone or copy them, or if you want the practice, you can try writing the Starships and People components from scratch.
The Main Component
Nothing special about the Main component. It's just a hero section that explains what this project is about and how to use it.
import React from "react";

function Main() {
    return (
        <main className="txt-shadow-red">
            <h1 className="main-title">STAR WARS API</h1>
            <h2 className="main-title">
                Use the previous and next buttons on each category to view the
                information provided by the Star Wars API
            </h2>
        </main>
    );
}

export default Main;
The App.jsx file
Here is where all the magic happens! We are going to import the Planets component and all others, whether copied, cloned, or created from scratch (this project will still work with just the Planets component).
The most important part of this whole project is for you to understand how it works, so let's step through it.
First, we will import useState from React and the components as well as the App.css file ( feel free to copy my CSS code).
Create a useState variable that holds the currently selected component
Create a Navbar with buttons that contain anonymous functions that set the currently selected component.
Use conditional rendering to only render the content of the currently selected component.
Import useState from React and the components
import React, { useState } from "react";

import "./App.css";
import Main from "./components/Main";
import Planets from "./components/Planets";
import People from "./components/People";
import Starships from "./components/Starships";
Create a useState variable that holds the currently selected component
const [selectedComponent, setSelectedComponent] = useState("Main");
Create a Navbar with buttons that contain anonymous functions
            <nav>
                <button onClick={() => setSelectedComponent("Main")}>Main Page</button>
                <button onClick={() => setSelectedComponent("Planets")}>Planets</button>
                <button onClick={() => setSelectedComponent("Starships")}>
                    Starships
                </button>
                <button onClick={() => setSelectedComponent("People")}>People</button>
            </nav>
Use conditional rendering to only render the content of the currently selected component.
            <div id="ctn-main">
                {selectedComponent === "Main" && <Main />}
                {selectedComponent === "Planets" && <Planets />}
                {selectedComponent === "Starships" && <Starships />}
                {selectedComponent === "People" && <People />}
            </div>
How it works
We create separate components for Planets, Starships, and People. Each component handles its own API call, rendering all of our chosen content to HTML card blocks to return. Since the Star Wars API URLs contain approximately 10 records per page, we use the next and previous URLs to set the requested page. If the next or previous URLs are null, we disable the corresponding button that runs the API call.
Then we import the components to the main App.jsx file. We create a Navbar and add buttons for each component to it, and also one for the Main component that acts as a Hero section. Each button has an onClick event that runs an anonymous function that sets the component chosen by the user to the selectedComponent variable.
In the final outcome, only the currently selected component is rendered on the page.
Here is the completed App.jsx file
function App() {
    const [selectedComponent, setSelectedComponent] = useState("Main");

    return (
        <>
            <nav>
                <button onClick={() => setSelectedComponent("Main")}>Main Page</button>
                <button onClick={() => setSelectedComponent("Planets")}>Planets</button>
                <button onClick={() => setSelectedComponent("Starships")}>
                    Starships
                </button>
                <button onClick={() => setSelectedComponent("People")}>People</button>
            </nav>
            <div id="ctn-main">
                {selectedComponent === "Main" && <Main />}
                {selectedComponent === "Planets" && <Planets />}
                {selectedComponent === "Starships" && <Starships />}
                {selectedComponent === "People" && <People />}
            </div>
        </>
    );
}
The finished project
Here are the links to the finished project:
My other API articles
Your first step into a larger world

© Lucasfilm Ltd. All Rights Reserved.
Advance your career with a 20% discount on Scrimba Pro using this affiliate link!
Become a hireable developer with Scrimba Pro! Discover a world of coding knowledge with full access to all courses, hands-on projects, and a vibrant community. You can read my article to learn more about my exceptional experiences with Scrimba and how it helps many become confident, well-prepared web developers!
Important: This discount is for new accounts only. If a higher discount is currently available, it will be applied automatically.
How to Claim Your Discount:
- Click the link to explore the new Scrimba 2.0.
- Create a new account.
- Upgrade to Pro; the 20% discount will automatically apply.
Disclosure: This article contains affiliate links. I will earn a commission from any purchases made through these links at no extra cost to you. Your support helps me continue creating valuable content. Thank you!
Conclusion
Learning to work with APIs is an essential skill for professional developers. There is definitely a learning curve when transitioning from working with APIs in JavaScript to React. To simplify the process and have more robust control and options, developers tend to use Axious for API calls when working with React.
To make this project as beginner friendly as possible, we only used React's useState and UseEffect, and then we used conditional rendering.
If this is your first time working with APIs in React, and you managed to successfully fetch data from the Star Wars API, convert it to JSON data, and display it, it is a grand achievement you should be proud of!
You've taken your first step into a larger world, working with APIs in React!
Let's connect! I'm active on LinkedIn and Twitter.


