

Creating a True/False Toggle in React with useState Hook for Beginners

Hello, I'm Michael. Like many people, I am an aspiring self-taught web developer.
My goal for this blog is to document and share the progress of my self-taught coding journey.
In this article, we learn how to create a true/false toggle using the React useState hook, and then we create a component that addresses the age-old controversy of whether Han Solo shot first or not!

Introduction
In this article, you'll learn how to create a true/false toggle in React using the useState hook. React hooks are a way to add functionality to functional components in React, and the useState hook is one of the most commonly used hooks. By using the useState hook, you can manage state changes in a way that's easy to understand and debug.
The HanSolo component example not only demonstrates how to create a true/false toggle using the React useState hook but also addresses the age-old controversy of whether Han Solo shot first or not!
So, if you're new to React or just getting started with hooks, this article is a great place to start!
The article outline
- Discuss what React hooks are.
- Explain the useState hook
- Importing and calling the useState hook
- Understanding the syntax
- Create a React useState true or false component
Note: We will be focusing on learning React code, not CSS. However, feel free to clone the project or copy the CSS code.
Finished project links
What are React hooks?
React hooks are a way to add functionality to functional components in React. They allow you to perform side effects, use state, and more.
In React, performing side effects means executing code that interacts with the outside world, such as fetching data from an API, manipulating the DOM, or setting a timer. Side effects are typically performed in React using the useEffect hook.
One of the most commonly used hooks is the useState hook, which allows you to add state to functional components.
The useState hook
The useState hook is used to declare a state variable and its initial value. You can then use this state variable in your component, and whenever the state updates, React will automatically re-render the component with the new state.
The useState hook returns an array with two values: the current state value and a state updater function to update that value. By using the useState hook, you can manage state changes in a way that's easy to understand and debug.
Importing and calling the useState hook
To import the useState hook for a component in React, you need to include it at the top of your file as follows:
import React, { useState } from 'react';

// Once imported, we can set the state as follows
const [count, setCount] = useState(0);
Another way to use React state is by calling the useState function directly from the React object. This syntax is less commonly used than the useState hook but can be useful in certain situations.
import React from 'react';

//If not imported, we can set the state as follows
const [count, setCount] = React.useState(0);
Understanding the syntax
This code below creates a variable called count that represents the current state value and a function called setCount that is used to update that value. The useState function is used to add state to a functional component, and the 0 inside the parentheses is the initial value of count. So, whenever setCount is called with a new value, React will automatically update the count variable and re-render the component with the new state.
const [count, setCount] = useState(0);
React useState true or false component
We are now going to step through creating a React component called HanSolo that toggles state between true and false values. The overall goal is to display a picture, the current state value, and a corresponding paragraph.
First, we will import the React useState hook by including { useState } to the top of the Han Solo component as follows:
import React, { useState } from 'react';
Component function
Next, we will create a HanSolo component function. As described earlier, we will create a state variable called didHanSoloShootFirst, name the state updater function setDidHanSoloShootFirst, and set the initial value to true (because Han shot first!).
function HanSolo() {
  const [didHanSoloShootFirst, setDidHanSoloShootFirst] = useState(true);
}
Toggle function
Inside the HanSolo component function, we are now going to create another function that toggles the true and false value of the didHanSoloShootFirst state variable. I am intentionally writing this code the long way, as an if/else if statement, so it is very clear to understand.
If the current state variable is equal to true, we use the state updater function to set it to false.
If the current state variable is equal to false, we use the state updater function to set it to true.
  function toggleDidHanSoloShootFirst() {
    if(didHanSoloShootFirst === true) {
        setDidHanSoloShootFirst(false);
    } else if (didHanSoloShootFirst === false) {
        setDidHanSoloShootFirst(true);
    }
  }
HTML Button
Now that we've created a function to toggle the state value of the component, we'll return a div element that includes a button. This button will use an onClick event listener to call the toggle function and update the component's state.
  return (
    <div className='container'>
      <button onClick={toggleDidHanSoloShootFirst}>Toggle Shoot</button>
    </div>
  );
Add an HTML element
Next, we will add an <h4> element that displays a sentence that includes the component's current state. The syntax might seem a little weird at first (It's easier to understand it if you relate it to JavaScript template literals).
In the code below, everything between the curly braces is JavaScript. The code is a simple ternary operator that returns the string "Yes!" if the state variable is true and returns the string "No!" if the state variable is false.
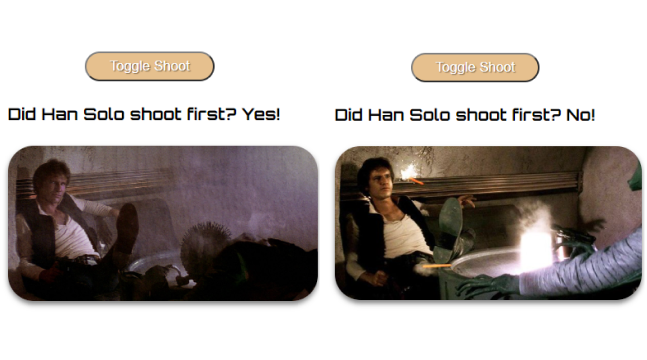
<h4>Did Han Solo shoot first? {didHanSoloShootFirst ? "Yes!" : "No!"}</h4>
The final result will return the following text for a state variable equal to true:
Did Han Solo shoot first? Yes!
The final result will return the following text for a state variable equal to false:
Did Han Solo shoot first? No!
Now we will add the <h4> element to the return div.
  return (
    <div className='container'>
      <button onClick={toggleDidHanSoloShootFirst}>Toggle Shoot</button>
      <h4>Did Han Solo shoot first? {didHanSoloShootFirst ? "Yes!" : "No!"}</h4>
    </div>
  );
Adding the images
At the top of the component JSX file, we will import two pictures and set them to variables as follows:
import React, { useState } from 'react';
import HanShotFirst from '../img/HanShotFirst.jpg'
import HanShotSecond from '../img/HanShotSecond.jpg'
Once we have imported the image files, we can once again use a JavaScript ternary operator to check the current state value of the didHanSoloShootFirst variable. If the current state value is true, we set the image source to the HanShotFirst. If the current state value is false, we set the image source to the HanShotSecond variable.
<img src={didHanSoloShootFirst ? HanShotFirst : HanShotSecond} />
We will now include the HTML image element in the return div as follows:
  return (
    <div className='container'>
      <button onClick={toggleDidHanSoloShootFirst}>Toggle Shoot</button>
      <h4>Did Han Solo shoot first? {didHanSoloShootFirst ? "Yes!" : "No!"}</h4>
      <img src={didHanSoloShootFirst ? HanShotFirst : HanShotSecond} />
    </div>
  );
True and false paragraphs
Finally, we will create two string variables to include in an HTML paragraph element; one paragraph for a true state value and the other for a false state value.
const paragraphHanShotFirst = "In the original 1977 release of Star Wars Episode IV: A New Hope, the cantina scene shows Han Solo shooting Greedo, a bounty hunter, first. This scene has sparked controversy among fans, as it depicts Han Solo as a more ruthless and morally ambiguous character. Some fans argue that this version of the scene accurately reflects Han Solo's character, while others believe that it contradicts his later development as a hero.";

const paragraphHanShotSecond = "The cantina scene in Star Wars Episode IV underwent changes in the 1997 re-release by George Lucas, including having Greedo shoot first and miss before Han Solo fires back. This version of the scene also generated controversy, with some fans arguing that it portrays Han Solo as less morally ambiguous and more of a traditional hero. Others believe that the change was unnecessary and that the original scene should have been left intact.";
Note: Since the content of the paragraphs doesn't change based on user interaction or other events, you can simply set them as regular string const variables. You don't need to create state variables for each paragraph.
We will now conclude this component by adding an HTML paragraph element that uses a JavaScript ternary operator to check the current state value and return the proper corresponding text string as follows:
<p>{didHanSoloShootFirst ? paragraphHanShotFirst : paragraphHanShotSecond}</p>
The finished component
import React, { useState } from 'react';
import HanShotFirst from '../img/HanShotFirst.jpg'
import HanShotSecond from '../img/HanShotSecond.jpg'

function HanSolo() {
  const [didHanSoloShootFirst, setDidHanSoloShootFirst] = useState(true);
  const paragraphHanShotFirst = "In the original 1977 release of Star Wars Episode IV: A New Hope, the cantina scene shows Han Solo shooting Greedo, a bounty hunter, first. This scene has sparked controversy among fans, as it depicts Han Solo as a more ruthless and morally ambiguous character. Some fans argue that this version of the scene accurately reflects Han Solo's character, while others believe that it contradicts his later development as a hero.";
  const paragraphHanShotSecond = "The cantina scene in Star Wars Episode IV underwent changes in the 1997 re-release by George Lucas, including having Greedo shoot first and miss before Han Solo fires back. This version of the scene also generated controversy, with some fans arguing that it portrays Han Solo as less morally ambiguous and more of a traditional hero. Others believe that the change was unnecessary and that the original scene should have been left intact.";

  function toggleDidHanSoloShootFirst() {
    if(didHanSoloShootFirst === true) {
        setDidHanSoloShootFirst(false);
    } else if (didHanSoloShootFirst === false) {
        setDidHanSoloShootFirst(true);
    }
  }

  return (
    <div className='container'>
      <button onClick={toggleDidHanSoloShootFirst}>Toggle Shoot</button>
      <h4>Did Han Solo shoot first? {didHanSoloShootFirst ? "Yes!" : "No!"}</h4>
      <img src={didHanSoloShootFirst ? HanShotFirst : HanShotSecond} />
      <p>{didHanSoloShootFirst ? paragraphHanShotFirst : paragraphHanShotSecond}</p>
    </div>
  );
}

export default HanSolo;
If you would like to learn how to set up a local React development environment, I wrote the following two beginner-friendly articles:
- Create a React Project, Push It to GitHub, and Deploy With Netlify, From the Command Line
- How to Create a Local React Environment with Vite
Advance your career with a 20% discount on Scrimba Pro using this affiliate link!
Become a hireable developer with Scrimba Pro! Discover a world of coding knowledge with full access to all courses, hands-on projects, and a vibrant community. You can read my article to learn more about my exceptional experiences with Scrimba and how it helps many become confident, well-prepared web developers!
Important: This discount is for new accounts only. If a higher discount is currently available, it will be applied automatically.
How to Claim Your Discount:
- Click the link to explore the new Scrimba 2.0.
- Create a new account.
- Upgrade to Pro; the 20% discount will automatically apply.
Disclosure: This article contains affiliate links. I will earn a commission from any purchases made through these links at no extra cost to you. Your support helps me continue creating valuable content. Thank you!
Conclusion
In this article, We've covered what React hooks are, how to use the useState hook, and how to create a component that toggles between true and false values, which addresses whether Han Solo shot first or not!
The useState React hook is one of the most commonly used hooks, and it is an excellent introductory hook for JavaScript developers just getting started with React.
The useState hook is a powerful tool that can help you manage state in your React applications with ease. Whether you're a fan of Han Solo shooting first or not, you should now better understand how to use this hook to create a true/false toggle in your React components. Remember, just like the Force, the useState hook can be a powerful ally in your journey as a React developer. May the hooks be with you!
Let's connect! I'm active on LinkedIn and Twitter.


